Analysis can be perfomed using two schemes:
Since these files were generated with a record length of 8190, they must be loaded into PAW using this record length:
PAW > hi/file 1 run00001.rz 8190
The RZ files contain the original online histos plus one N-tuple contning all ADC, TDC and PCOS data:
PAW > nt/print 1

******************************************************************
* Ntuple ID = 1      Entries = 500000    Trigger
******************************************************************
* Var numb * Type * Packing *    Range     *  Block   *  Name    *
******************************************************************
*      1   * U*4  *         *              * NUMBER   * Run
*      2   * U*4  *         *              * NUMBER   * Number
*      3   * U*4  *         *              * NUMBER   * Time
*      1   * I*4  *         * [0,54]       * ADC0     * NADC0
*      2   * U*4  *    16   *              * ADC0     * ADC0(NADC0)
*      1   * I*4  *         * [0,24]       * TDC0     * NTDC0
*      2   * U*4  *    16   *              * TDC0     * TDC0(NTDC0)
*      1   * R*4  *         *              * PCOS     * ax
*      2   * R*4  *         *              * PCOS     * ay
*      3   * R*4  *         *              * PCOS     * bx
*      4   * R*4  *         *              * PCOS     * by
******************************************************************
*  Block   *  Entries  * Unpacked * Packed *   Packing Factor    *
******************************************************************
* NUMBER   *  500000   * 12       * 12     *       1.000         *
* ADC0     *  500000   * 220      * Var.   *    Variable         *
* TDC0     *  500000   * 100      * Var.   *    Variable         *
* PCOS     *  500000   * 16       * 16     *       1.000         *
* Total    *    ---    * 348      * Var.   *    Variable         *
******************************************************************
* Blocks = 4            Variables = 11      Max. Columns = 87    *
******************************************************************
PAW >
The variables have following meaning:
| Run | Run number |
|---|---|
| Number | Event number (usually 1-500000) |
| Time | Time when the even was taken in seconds since 1.1.1970 UTC |
| NADC0 | Size of ADC0 bank, fixed to 54 |
| ADC0 | Raw ADC array ADC0(1)...ADC0(54) |
| TADC0 | Size of TDC0 bank, fixed to 24 |
| TDC0 | Raw TDC array TDC0(1)...TDC0(24) |
| ax | X coordinate of first (upstream) beam profile chamber |
| ay | Y coordinate of first (upstream) beam profile chamber |
| bx | X coordinate of second (downstream) beam profile chamber |
| by | Y coordinate of second (downstream) beam profile chamber |
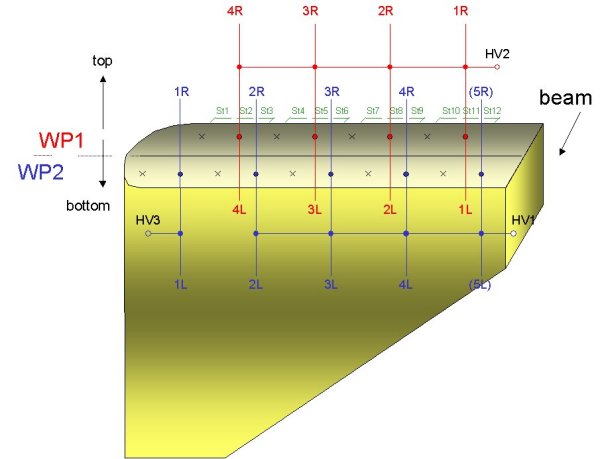
The ADC and TDC channel assignments were as follows:
| Channel | ADC Signal | TDC Signal |
|---|---|---|
| 1 | WP1_1L (ADC1, slot 18) | WP1_1L (TDC1, slot 15) |
| 2 | WP1_2L | WP1_2L |
| 3 | WP1_3L | WP1_3L |
| 4 | WP1_4L | WP1_4L |
| 5 | WP1_1R | WP1_1R |
| 6 | WP1_2R | WP1_2R |
| 7 | WP1_3R | WP1_3R |
| 8 | WP1_4R | WP1_4R |
| 9 | WP2_1L | WP2_1L (TDC2, slot 16) |
| 10 | WP2_2L | WP2_2L |
| 11 | WP2_3L | WP2_3L |
| 12 | WP2_4L | WP2_4L |
| 13 | bad (ADC2, slot 19) | WP2_1R |
| 14 | WP2_1R | WP2_2R |
| 15 | WP2_2R | WP2_3R |
| 16 | WP2_3R | WP2_4R |
| 17 | WP2_4R | RF (TDC3, slot 17) |
| 18 | ST2_1 | S0 |
| 19 | ST2_2 | S1 |
| 20 | ST2_3 | S2 |
| 21 | ST2_4 | Spare1 |
| 22 | ST2_5 | Spare2 |
| 23 | ST2_6 | Spare3 |
| 24 | ST2_7 | Spare4 |
| 25 | ST2_8 (ADC3, slot 20) | |
| 26 | ST2_9 | |
| 27 | ST2_10 | |
| 28 | ST2_11 | |
| 29 | ST2_12 | |
| 30 | ST2_13 | |
| 31 | ST2_14 | |
| 32 | ST2_15 | |
| 33 | spare | |
| 34 | spare | |
| 35 | spare | |
| 36 | spare | |
| 37 | ST1_1 (ADC4, slot 21) | |
| 38 | ST1_2 | |
| 39 | ST1_3 | |
| 40 | ST1_4 | |
| 41 | ST1_5 | |
| 42 | ST1_6 | |
| 43 | ST1_7 | |
| 44 | ST1_8 | |
| 45 | ST1_9 | |
| 46 | ST1_10 | |
| 47 | ST1_11 | |
| 48 | ST1_12 | |
| 49 | S0 (ADC5, slot 22) | |
| 50 | S1 | |
| 51 | S2 | |
| 52 | Spare1 | |
| 53 | Spare2 | |
| 54 | Spare3 |
The following picture shows the naming scheme of the wires and strips:
After you installed the package, you should have the /usr/local/bin/odbedit
program and the /usr/local/lib/libmidas.a library (Linux). Under Windows
NT, these file are located under \midas\nt\bin\odbedit or
\midas\nt\lib\midas.lib. The next step is to download the online analyzer. It is
available from this page as a Windows zip file and a Linux tar file. The zip file should be extracted to \meg
in order to make the analyzer.dsw (the Visual C++ project file)
working. The Linux tar file has a Makefile to compile the analyzer.
Next you need the CERN library to compile the analyzer. A NT version is located on
this server as a zip file. It should be unzipped using
the path names in order to get a \cern\lib and \cern\bin
directory. The NT path should be changed (using "Properties"/"Environment" from
a right mouse click on the "My Computer" icon) to point to \cern\bin
so that PAW can be started by entering pawnt.
Once the analyzer is recompiled, it can be started on a *.mid file, which are also available from the PSI archive under ftp://muegamma@psarchive.psi.ch:1021/oct00/data/runxxxxx.mid. The analyzer can then be started like:
analyzer -i run00001.mid -o run00001.rz
to produce a N-tuple file from the raw data file. By default, no bank is written into the N-tuple file. They have to be turned on via their flags in the ODB. Enter following to turn on the ADC0 bank:
c:\meg>odbedit
[local:MEG:S]/>cd "Analyzer/Bank switches/"
[local:MEG:S]Bank switches>set adc0 1
[local:MEG:S]Bank switches>quit
c:\meg>
and then restart the analyzer (the ODB is persistent between runs). It is now possible to edit the analyzer code (most probably you would like to make additions in the histo.c file, recompile the analyzer and rerun it.
There is some more information available on a page concerning the pibeta analyzer, where most of the info is also valid for the Muegamma analyzer.
Again, if you encounter problems call me.
 S. Ritt, Nov 7th, 2000